Loading... Learn AI 系列文章: [1. Setup ubuntu server 20.04 for machine learning](https://www.helloyiyu.com/index.php/ai/28.html) [2. Try run PyTorch Quickstart demo](https://www.helloyiyu.com/index.php/ai/32.html) [3. 使用Ollama和OpenWebUI本地运行llama3大语言模型](https://www.helloyiyu.com/index.php/ai/39.html) --- ### 1 apt update & upgrade 安装Ubuntu 20.04以后,首先进行系统包更新 ```shell $ sudo apt update $ sudo apt full-upgrade --yes $ sudo apt autoremove --yes $ sudo apt autoclean --yes $ reboot ``` ### 2 linux basic tools #### 2.1 docker 添加阿里云GPG秘钥 ```shell curl -fsSL http://mirrors.aliyun.com/docker-ce/linux/ubuntu/gpg | sudo apt-key add - ``` 设置存储库 ```shell sudo add-apt-repository "deb [arch=amd64] http://mirrors.aliyun.com/docker-ce/linux/ubuntu $(lsb_release -cs) stable" ``` 安装docker ```shell sudo apt-get update sudo apt-get install docker-ce docker-ce-cli containerd.io docker-compose-plugin --yes ``` #### 2.2 code server 安装code-server(默认只为当前用户安装) ```shell curl -fsSL https://code-server.dev/install.sh | sh ``` 设置code-server开机自动启动 ```shell sudo systemctl enable --now code-server@$USER ``` 修改默认端口和密码 ```shell vim .config/code-server/config.yaml cat .config/code-server/config.yaml bind-addr: 0.0.0.0:8086 auth: password password: xxxxxxxx cert: false sudo restart code-server@$USER ``` #### 2.3 development tools 安装常用的编译开发工具 ```shell sudo apt install build-essential pkg-config cmake ninja-build ``` ### 3 conda and python env #### 3.1 miniconda **Note**: conda已经包含Python及常用包,安装了conda就不用再安装Python和pip。 Conda是一个与语言无关的跨平台包和环境管理器。虽然conda发源于Python的PyData社区,但是它不仅适用于管理Python包,而且还是一个通用的包管理工具。用conda可以创建、管理任何类型的、用任何语言写的包和依赖。它很像一个跨平台版本的apt或者yum。在机器学习领域,常用conda来管理Python env (conda env)。 对比Python pip的方式来管理python env,conda能更好的管理各个包的依赖关系,减少莫名其妙的错误,**推荐能用conda的指令,都优先使用conda,少数某些包conda找不到的话,才到对应的conda env下通过pip安装**。 miniconda是一个小化的 conda 安装器,仅仅包含 Python,conda 以及 conda 必须的核心最小包,例如 pip/zlib 等,安装文件只有数十MB。 安装miniconda ```shell mkdir -p ~/miniconda3 wget https://repo.anaconda.com/miniconda/Miniconda3-latest-Linux-x86_64.sh -O ~/miniconda3/miniconda.sh bash ~/miniconda3/miniconda.sh -b -u -p ~/miniconda3 rm -rf ~/miniconda3/miniconda.sh ``` 终端env初始化(执行后重启终端或者 source ~/.bashrc) ```shell ~/miniconda3/bin/conda init bash ~/miniconda3/bin/conda init zsh ``` pip设置国内源 ```shell (base) yiyu@eastforest:~$ mkdir .pip (base) yiyu@eastforest:~$ vim .pip/pip.conf (base) yiyu@eastforest:~$ cat .pip/pip.conf [global] trusted-host=pypi.tuna.tsinghua.edu.cn index-url = https://pypi.tuna.tsinghua.edu.cn/simple ``` conda设置国内源 ```shell (base) yiyu@eastforest:~$ conda config --set show_channel_urls yes (base) yiyu@eastforest:~$ vim ~/.condarc (base) yiyu@eastforest:~$ cat ~/.condarc channels: - defaults show_channel_urls: true default_channels: - https://mirrors.tuna.tsinghua.edu.cn/anaconda/pkgs/main - https://mirrors.tuna.tsinghua.edu.cn/anaconda/pkgs/r - https://mirrors.tuna.tsinghua.edu.cn/anaconda/pkgs/msys2 custom_channels: conda-forge: https://mirrors.tuna.tsinghua.edu.cn/anaconda/cloud msys2: https://mirrors.tuna.tsinghua.edu.cn/anaconda/cloud bioconda: https://mirrors.tuna.tsinghua.edu.cn/anaconda/cloud menpo: https://mirrors.tuna.tsinghua.edu.cn/anaconda/cloud pytorch: https://mirrors.tuna.tsinghua.edu.cn/anaconda/cloud pytorch-lts: https://mirrors.tuna.tsinghua.edu.cn/anaconda/cloud simpleitk: https://mirrors.tuna.tsinghua.edu.cn/anaconda/cloud deepmodeling: https://mirrors.tuna.tsinghua.edu.cn/anaconda/cloud/ ``` 一些常用的conda指令 ```shell # 查看conda info conda info # 查看conda env列表 conda env list # 创建conda env conda create -n "envName" # 创建指定python版本的conda env conda create -n "envName" python=3.10 # 激活conda env conda activate "envName" # 退出conda env conda deactivate "envName" # 删除conda env, 如果没有"--all",会出现移除不干净的情况 conda remove -n "envName" --all ``` conda env内,常用package管理指令 ```shell # 显示该环境下的所有包 conda list # 安装[packageName]包 conda install [packageName] # 在Python2编译环境中安装numpy包 conda install -n py27numpy # 搜索[packageName]包 conda search [packageName] # 卸载[packageName]包 conda uninstall [packageName] ``` ### 4 jupyter lab **Note**: 因为 jedi 0.18.0 不支持 iPython 7.19,解决方案:将 jedi 0.18.0 降为 0.17.2。不能使用 conda 安装,因为 conda 中找不到 jedi 这个包。要进入 conda 环境使用 pip 安装。 新建一个conda env来安装jupyter lab ```shell conda create -n jupyter python=3.1 conda activate jupyter pip install jedi==0.17.2 conda install -c conda-forge jupyterlab ``` 生成jupyter lab配置文件 ```shell jupyter lab --generate-config ``` 修改`/home/yiyu/.jupyter/jupyter_lab_config.py`文件: ```json #设置服务监听的IP(默认只监听本地localhost) c.ServerApp.ip = '0.0.0.0' # 服务端口 ServerApp.port = 8888 #禁止在界面上显示退出按钮 c.ServerApp.quit_button = False #设置jupyter lab根目录 c.ServerApp.root_dir = '/home/yiyu/jupyter_notebook' ``` Run ```shell jupyter lab ``` ### 5 PyTorch [PyTorch](https://pytorch.org/) 是广泛支持机器学习算法的常用科学计算框架。 如果计算机内置了 GPU,它可利用该 GPU 来加速深度学习。 #### 5.1 PyTorch (CPU) 首先访问pytorch的[官网](https://pytorch.org/),它上面有根据你的系统环境信息自动提示的安装cmd。 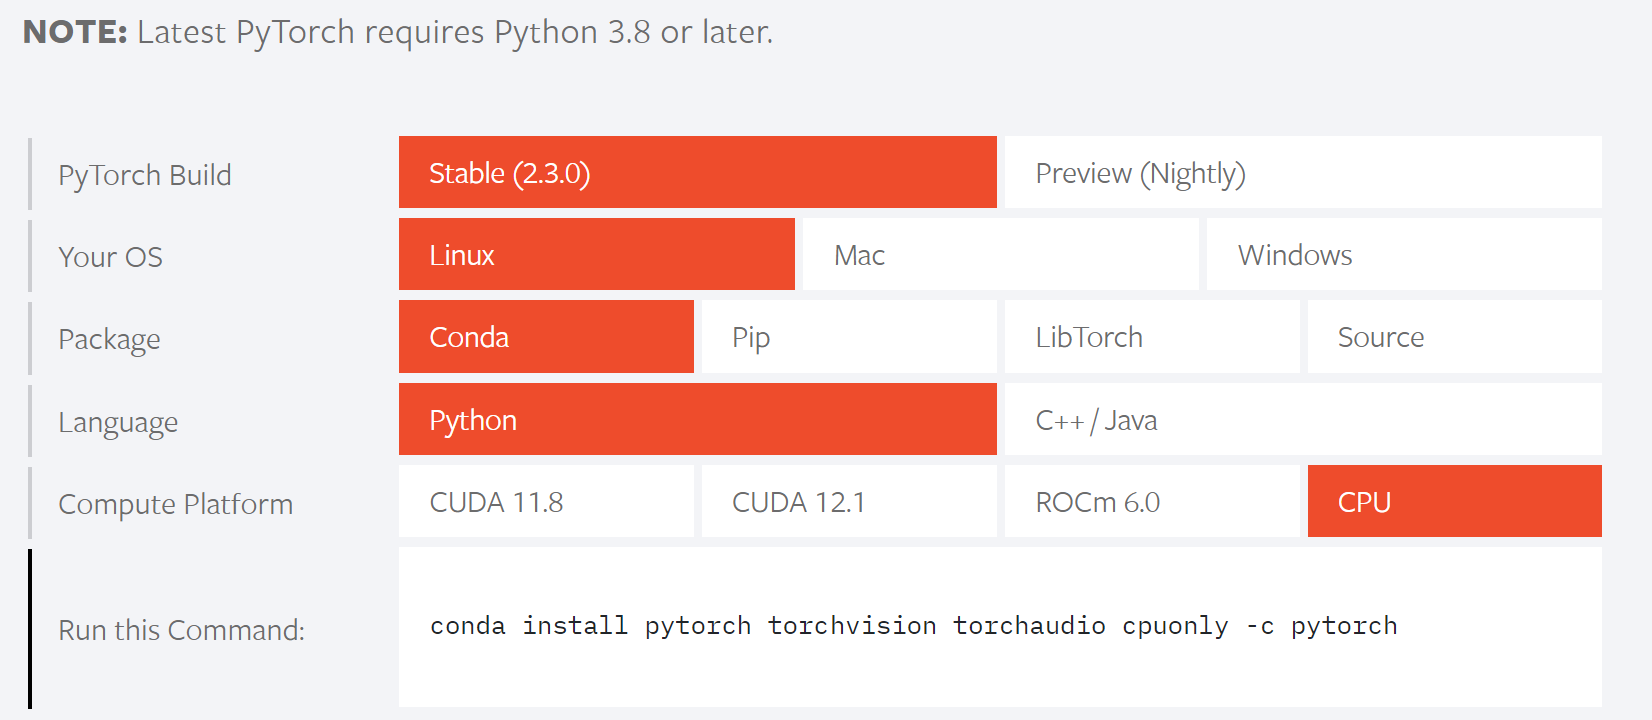 以安装当前最新版本+CPU训练为例,它提示需要Python 3.8或更高,那么首先创建一个python 3.10的conda env,并安装pytorch。 ```shell conda create "pytorch_3_10" python=3.10 conda create -n pytorch_3_10 python=3.10 conda activate pytorch_3_10 conda install pytorch torchvision torchaudio cpuonly -c pytorch ``` 安装完毕后,为了在jupyter中能直接切换到pytorch_3_10这个python环境下进行测试,需要安装ipykernel并添加新的kernel。 ```shell # 这个需要在pytorch_3_10环境下执行 conda install ipykernel python -m ipykernel install --user --name pytorch_3_10 --display-name "pytorch-cpu-3.10" ``` 在jupytor lab中验证版本信息 ```python import numpy import torch import torchvision numpy.__version__ torch.__version__ torchvision.__version__ ``` ``` '1.26.4' '2.3.0' '0.18.0' ``` ### 6 Refs: [Ubuntu 22.04 for Deep Learning.md · GitHub](https://gist.github.com/amir-saniyan/b3d8e06145a8569c0d0e030af6d60bea) [Ubuntu深度学习环境搭建:安装Cuda、CuDNN、TensorFlow - 小昇的博客 (xiaosheng.blog)](https://xiaosheng.blog/2017/10/21/how-to-build-dl-environment) https://zhuanlan.zhihu.com/p/449750184 https://blog.zengrong.net/post/conda-and-jupyter-lab/ 最后修改:2024 年 06 月 02 日 © 允许规范转载 打赏 赞赏作者 支付宝微信 赞 如果觉得我的文章对你有用,请随意赞赏
